Original game date: October 19, 2019
The game resumes in The Hold of Deadstone Cleft, where Fortune’s Irregulars have just defeated the ghost of the ancient black dragon Khisanth, and her stone giant thrall Thane Kayalithica. A squad of stone giants has just burst into the room from the Upper Terraces to find the party standing over the body of their dead leader.
Carver Meneaus steps forward, holding up her runestick and demands the respect owed a Carver and calls on the giants to calm themselves. She explains that the evil spirit, the maug, that had possessed their Thane had brought her destruction. An attempt by Aesar to defend themselves does not go over well, but Meneaus is able to successfully talk them down and assigns tasks to get the giants out of the room. She is soon backed up by the arrival of her daughter Antigone, as well as Crassus, Erastus and one other stone giant (who Meneaus had tossed off the ledge).
After shutting the door in the faces of the confused stone giants, she tells Fortune’s Irregulars that they must leave quickly. She apologizes for the rudeness and thanks them for their help. She won’t forget. Searching the body of the fallen Thane, she takes up a collar of office and a broken conch shell. She explains that it was a magic shell, given to powerful leaders among the giants that permitted teleportation to Maelstrom, the seat of the most powerful Storm Giant king, Hekaton. She had hoped to use it to inform King Hekaton of the apparently perfidious actions of the Cloud Giants. Now she must consider asking King Vigroth of the nearby Frost Giants if she might use his conch.
Departing Deadstone Cleft
The party is lead back down through The Arcade and then out through some tunnels and travel some distance away, with the sound of water, both streaming and dripping growing louder. Meneaus brings them to an underground waterfall, broken into three parts. She explains that if they ascend the waterfall they will discover the stone tree but that she must return to her people. She advises caution for they go toward a place of great maug. Aesar suggests that perhaps they will cleanse the place of Maug. She is dubious but after witnessing their powers, nothing would surprise her.
Everyone is able to climb the water stairs without much difficulty, though Aesar gets a bit scraped up and bruises more than his ego. Climbing up through the hole through which the water streams, they find themselves in another cavern, where the main feature is an immense stone tree down which water drips constantly from above, before it gathers into a rivulet and heads further down. The tree is a mix of natural carving by the water, and the work of stone giant hands. While Ander uses a Dimension Door spell to get he and Grellosh to the top, Saul morphs into a gorilla and climbs up the Rope of Climbing, which he uses to help get Vorai and Aesar up. Dawnstalker makes his own way.
Stride Toward the Face of Death
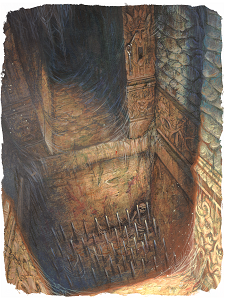
The party now finds itself in a narrow cravasse with steap nearly vertical walls on either side and muddy ground. A number of rivulets collect in this place. Moving outward they discover that they are in a large valley, the Vale of Arnoch within the Nether Mountains. A large mound in the centre of the vale, draws their attention as it does not seem to be a natural formation. While some of the party prepares camp and hunts for food, others examine it more closely.
Although they find no entrances, Aesar and Vorai are able to observe that a series of pits filled in with dark stone on the top of the mound give the distinct impression of a skull. They decide to wait for morning to explore further and sit down to a meal of delightfully spiced goat expertly prepared by Vorai.
The night passes uneventfully, though before they turn in, Aesar explains to the group about his quest for an Enigma Stone, and the Heart Room, and the various books he discovered. For him this is about more than the Draakhorn. He also tells them of his rival, Maximillian de Rigueur, who none of them liked anyway.
The next day the group begins their exploration of the mound and though it takes several hours, eventually they discover that the broken north face conceals a passage. After spending several hours watching Aesar and Dawnstalker digging it out, Saul steps in with an Earth Mold spell to quickly finish off the work.
Entrance to the Tomb of Horrors
Bright, brilliant colours are to be seen everywhere, the stones and pigments undimmed by the passage of time. The floor of the corridor is a colouful mosaic of stone, with a distinct, winding path of red tiles about two feet wide snaking its way south down the corridor. No stonework can be seen on the walls or the ceiling twenty feet above, for some sort of cement or plaster has been smoothed over all of these surfaces and then illustrated. The scenes show fields of kine grazing, a copse with several wolves in the background, workers of various races and strange human-animal mixtures – pig-human, ape-human, and dog-human – going about various tasks. Certain of the frescoes show rooms of some building – a library filled with many books and scrolls, the door of a torture chamber, and a wizard’s work room.
The dungeon crawl gets off to a poor start, with Vorai falling through the floor onto poisoned spikes when he goes to explore a bronze chest that is embedded in the wall. Wedging the floor trap closed after extracting their rogue, the party has a closer look at the chest, opening it up to discover a rod in the bottom. Using an Unseen Servant to agitate the rod, triggers a trap that shoots a hail of poison darts down upon the whole party and nearly killing Ander.

After taking a short rest and contemplating their life choices, Saul summons a small herd of cows who he sends down the corridor to discover the location of several more pit traps in a rather sad spectacle of carnage. Aesar meanwhile, discovers a message hidden in the red tiles:
Acererak congratulates you on your powers of observation, so make of this whatever you wish, for you will be mine in the end no matter what!
Go back to the tormentor or through the arch, and the second great hall you’ll discover.
Shun green if you can, but night’s good color is for those of great valor.
If shades of red stand for blood, the wise will not need sacrifice aught but a loop of magical metal – you’re well along your march.
Two pits along the way will be found to lead to a fortuitous fall, so check the wall.
These keys and those are most important of all, and beware of trembling hands and what will maul.
If you find the false you find the true, and into the columned hall you’ll come, and there the throne that’s key and keyed.
The iron men of visage grim do more than meets the viewer’s eye.
You’ve left and left and found my tomb, and now your souls will die.
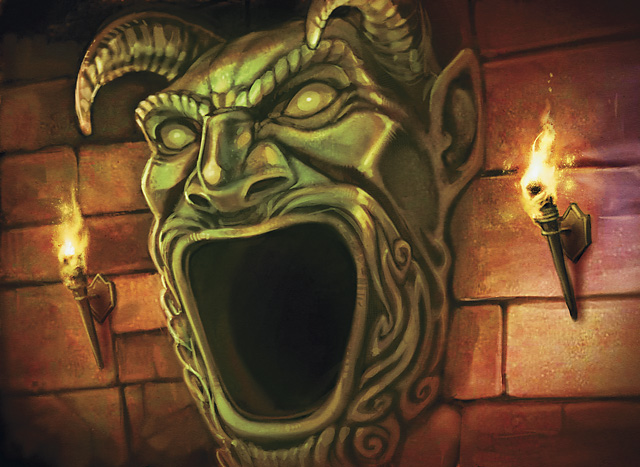
At the end of the hall there is a large green devil’s head with a gaping mouth, into which Saul urges a remaining cow. The cow’s body immediately falls to the side, its head and shoulders instantly annihilated.
Next to the demon’s head, is a portal filled with vapour. The stones on either side of the base and the keystone all protrude slightly and begin to glow when they approach – the left-hand base yellow, the right-hand base orange and the keystone blue.
Throwing caution to the wind, Saul presses the blue stone and steps into the mist. He finds himself in a small square room with no exits, and three levers on one wall which can be moved in any direction.
While Saul experiments with the levers, the others try pressing the stones in various combinations. No one has much success at first, but Saul eventually lifts all three levers up and reveals a crawl space in the ceiling, which he is able to use to get back to the others (narrowly avoiding falling through a pit). Soon enough, they crack the code – yellow, blue, orange, and the vapor disappears to reveal a hallway. Walking through the hallway off of the red path, teleports them to a new chamber.
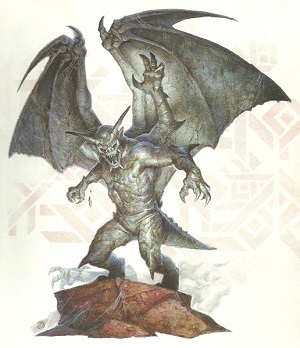
The Three-Armed Statue
This small room holds what appears to be a statue of a gargoyle, eight feet tall, with four arms. One of the arms is broken off and lies on the floor in front of the statue.
First Vorai and then Saul try to figure out the mystery of the statue to no avail. The arm cannot be re-attached. They do discover that in the palm of the severed arm, there is a carved depression which seems like it would fit a gem stone. Saul theorizes that there is an invisible gem in the room, perhaps a Gem of True-Seeing, but neither Oberon or Ander‘s Lantern of Revealing finds anything. Carrying the broken arm with them, the party continues deeper into the dungeon.
Great Hall of Spheres
Similar to the entrance is size and shape, the floor is inlaid tiles and the walls and ceiling are painted with figures of animals, strange signs and glyphs. The theme of the room however is spheres, with a total of 20 such circles appearing equally spread across the west and east walls. The party enters through the Golden sphere, which is depicted as being held overhead.
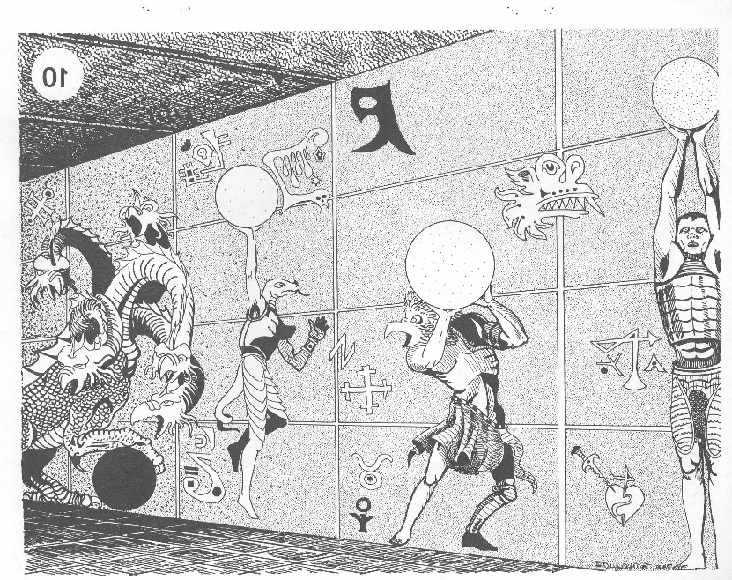
After a thorough search, the party determines that two doors that appear in the west wall are false doors with spear traps. They discover secret crawl spaces behind illusory spheres (black, red), and a secret door in the east wall.
There is also an archway at the end of the hall, filled with magical vapour. Like the previous arch, this one has three stones that stand out and glow when approached – citron on the right, olive on the left and russet on the keystone.
Vorai and Aesar made their way through the crawl space behind the black sphere, and followed its long and twisting route to discover a chapel, featuring scenes of normal life, but with the people appearing to have rotting flesh, skeletal hands and worms eating them. Yet there are also depicted various religious symbols of good alignment. There are four rows of wooden pews facing a wooden railing that divides the room. South of it is an altar is a tiered dais on which sits a wooden chair.
Returning to their compatriots in the Great Hall, they report what they discovered. The party next checks out the secret door, finding another door behind it, with 7 studs in a row in place of a regular handle/lock. The party decides to leave this route (and the archway) unexplored for now and instead check behind the red sphere.
Chamber of the Three Chests
Scrambling carefully through the secret crawl space and finding no traps, the short trek ends in a secret door that Aesar discovers, only realizing too late that it is place high in the wall and tumbling into the new chamber.
The new room is square in shape and features three large chests – one gold, one silver and one wood. Inspecting the wood chest and discovering no traps, they open it only to have the immense skeleton of a stone giant rise up and attack.
As the others try to catch up, making their way through the crawl space, Vorai and Aesar fight off the skeleton and dispatch it as the others arrive, an overconfident Ander taking the tumble into the room this time.
Opening the gold chest next, a large swarm of poisonous snakes pours out, attacking Vorai before the combined efforts of the party ends the threat.
Finally, the silver chest is opened to reveal a crystal chest containing a magic ring. Aesar successfully removes the chest and disables a trap beneath it. The ring is discovered to be a Ring of Protection.
The Chapel
The entire party next returned through the crawl space behind the black sphere to the strange chapel, exploring it further. When he arrives, Grellosh casts a Detect Traps spell, revealing that the front row of pews is trapped. Aesar is able to disable the trap, which is revealed to be a poison gas trap. The other pews are opened to discover a large quantity of coins – 4000 gp, 8000 sp, 6000 ep.
The south end of the chapel is examined more closely, revealing a sprawled on the floor a human skeleton in rusted black mail, whose outstretched arm points to another archway filled with vapour, though this one has no stones that glow in its frame.
They also discover a discrete wall slot with the letter O faintly traced above it. Dropping in the Ring of Protection causes the wall to sink into the ground and reveals a new short crawl space that emerges at the top of a short flight of stairs leading down. Pushing on, the party leaves the rest of the chapel unexplored.
Doors and Pits
The stairs lead down to a short corridor ending in a door. The door is found not to be trapped, but when Aesar pushes it open he discovers a trapped floor on the otherside and is unable to stop himself from pitching forward into the pit and landing on poison spikes.
The new room is small, half of it is taken up by the pit, and the other five foot space ending in another similar door. Remembering the line in the message from Acererak about “Two pits along the way will be found to lead to a fortuitous fall, so check the wall”, Aesar has a look around but discovers nothing of note.
After tying themselves together and cautiously maneuvering over the pit, Aesar and Vorai examine the next door. Turning himself into a gorilla, Saul decides to head through, but even in his new form he is unable to avoid the pit trap on the other side. Looking around the pit, Saul does not see anything of importance.
Beginning to doubt themselves, the party advances to a third door, and this time take the time to open it carefully inward so as to avoid the next pit. Dawnstalker props up the floor allowing Aesar to descend into the pit and have a look around. On the south wall of the pit is a wooden door painted to look like stone.
It is discovered to be untrapped, and the party prepares to push deeper into the tomb.